Quantcast
Channel: Skip To My Lou
Viewing all 1107 articles
Browse latest View live

Summer Camp Care Package Idea {FREE printable tags}

$
0
0
camp care package notes

My little girl should be receiving this summer camp care package while at a sleep-away camp! Last year I sent a similar care package with inspirational cute sayings for candy and small gifts. Here is this year’s updated version!

summer camp care package

Summer Camp Care Package

I tried to think of bible verses for candy bars and small gifts. I wanted to remind her to pray, be kind and that she is precious! With these printable tags, you will find scripture candy sayings and other inspirational sayings paired with small gifts.

inspirational cute sayings for candy and gifts

Bible Verses for Candy Bars and Small Gifts

  • Donut worry be happy! Jeremiah 29:11 (donuts)
  • In sticky situations Pray! Philippians 4:6 (gum)
  • Why wish upon a star when you can pray to who created it? (Starbursts candy)
  • You are more precious than jewels! (Ring Pop)
  • Be Kind Be Amazing Be YOU! Psalm 139:14 (Kind bar)
  • Push yourself to be your best! Isaiah 40:31(Push Pop)
  • God Loves you s’more than you know (s’mores)
  • Look for the good in others!  Ephesians 4:32 (sunglasses)
  • God keeps His promises! Genesis 9:16 (Skittles)
  • Walk with Jesus (flip-flops or cozy socks)
  • Trust in the Lord with all your heart, and do not lean on your own understanding. In all your ways acknowledge him, and he will make straight your paths. Proverbs 3:5-6
  • He is the light! John 8:12 (flashlight)
bible verses for candy bars

{Printable Camp Care Package Notes}

camp care package notes


camp care package notes

Pack all the goodies in a box and you are ready to go.

sleep away camp gift ideas

I made three small packages for the most darling girls! I hope this small gesture shows how much they are loved!

summer camp care packages

I used some of last year’s printable tags. They also paired scriptures and inspirational sayings with small gifts and candy. You can mix and match the printable tags to make the perfect summer camp care package.  Many of the notes work for more than just camp. How about using them as small gifts for a friend that could use encouragement.

summer camp care package

Here are the printable notes we used for a feel better soon care package.

feel better soon care package filled with candy

…. and these care package printable gift tags

care package

Looking for more inspiration you will love these FREE printable life quotes and these motivational quotes and these friendship quotes are perfect for that special friend!


The post Summer Camp Care Package Idea {FREE printable tags} appeared first on Skip To My Lou.


Delicious Instant Pot Honey Mustard Chicken

$
0
0
honey mustard chicken on plate

Honey Mustard Chicken is an easy delicious dinner! This one you will have it ready from start to finish in less than 30 minutes.
instant pot honey mustard chicken dinner

Honey Mustard Chicken Dump Meal

Almost two years later and we still use the Instant Pot pressure cooker almost every night.  If it isn’t cooking up the whole meal it is at least making a side dish. Be sure to check out my family’s favorite pressure cooker recipes.

We are a huge fan of the dump meals.  At the beginning of the week, we fill a series of gallon zip lock bags with meat, spices, sauces and other ingredients and freeze.  When it is dinner time we take the frozen meal out of the freezer, remove from the bag and place the contents in the Instant Pot and cook.  I add 10 mins to the cooking time when frozen.

Very little prep one day of the week gives you hassle-free meals all week long with no planning or prep. The best part is they don’t have to be thawed first so if you forget to remove from the freezer you can still easily get dinner on the table.


instant pot honey mustard chicken on plate

Instant Pot Honey Mustard Chicken Recipe

Honey Mustard Chicken

Only three ingredients needed for this tasty chicken dinner!

  • 4 chicken breasts
  • 1/2 cup mustard
  • 1/2 cup honey
  • 1/2 cup water (place inside the instant pot)
  1. Add chicken breasts, mustard, and honey to your Instant Pot, along with 1/2 cup of water

  2. Cook for 10 minutes on high pressure, or 20 minutes for frozen. If you have time allow 10 minutes for natural release. This will make meat more tender

  3. Remove chicken from sauce, cut in cubes if desired. Add cubed chicken back to the sauce and serve over rice or noodles.

DUMP MEAL INSTRUCTIONS

When making this as a dump meal, cut chicken into 1 1/2 inch – 2-inch cubes before freezing.  Place all ingredients except water inside a 1-gallon zip lock bag.  When ready to cook place 1/2 cup water inside the Instant Pot then the frozen chicken, mustard, and honey mixture. Cook at high pressure for 20 minutes. If you have time a 10-minute natural release will give a more tender meat.  It is still delicious if you have to do a quick release.


I have a free printable got to guide for Instant Pot cooking times. Print it off and hang it inside your cabinet door as a handy reference!

Instant Pot Cheat Sheet

instant pot cheat sheet

The post Delicious Instant Pot Honey Mustard Chicken appeared first on Skip To My Lou.

How to dye your hair with Kool Aid

$
0
0
kool aid hair dye

Have you ever wondered how to dye your hair with Kool Aid?  It is an easy way to add color to your that isn’t permanent. Kool Aid hair dye is a great way to experiment with a different hair color without a long-term commitment!  Kids will have fun trying out different hair colors.  This is one of the many creative  Kids Crafts and Activities we are sharing this summer here on Skip to my Lou. There is no reason to be bored! Just check out this boredom buster idea list for inspiration.

kool aid hair dye

Kool Aid Hair Dye

This Summer we are trying to do some fun things that are unexpected, fun and things we can’t do during the school year. My daughter’s one request was to have color in her hair.  So I decided that we would let her have her crazy colored hair this Summer since we don’t have any school policy’s holding us back. But our biggest dilemma was that she couldn’t decide on what color she wanted to have. First, it was red, then blue, then pink, purple was thrown in there once too. The only one I told her we wouldn’t do was green because I didn’t want her to look like a little blonde who spent too much time in the pool. We spent too many efforts last year preventing her hair from turning green from our daily swims!

I came up with the perfect solution to her color problem, we would do temporary Kool Aid hair dye colors all Summer long and she can pick whatever color she wants next once the color has faded.

add temporary hair color to your hair using kool-aid

We decided to do the Kool-Aid method. Did you do this when you were a kid? Who didn’t right?!

This was really simple and because of my daughter’s blonde hair didn’t take us long at all. Just something to remember, the darker the hair color, the longer it’s going to take for the color to take hold. It does work better on lighter hair. Follow all these instructions and tips so you know everything you need to know on how to dye your hair with Kool Aid.

Supplies for Kool Aid Hair Dye

  • Old T-shirt
  • 2-3 packages Kool-Aid
  • 2 cups water
  • cup or bowl
  • comb
  • blow dryer
  • hot straightening iron

Kool Aid Hair Dye Color Ideas

My daughter actually wanted purple hair this time around, so we used 2 Purplesaurus Rex packages and 1 cherry to give it a deeper color. It was a very purple liquid but came out more of a deep pink color in her hair. Next time we may try grape instead and see where that gets us!! This chart seems to give some good color combo ideas but unfortunately didn’t have a purple option. You might like some of these color ideas.

  • Mixing strawberry and grape can make a purplish red
  • Cherry can produce deeper red
  • Tropical punch can give a brighter red
  • Black-cherry mixed with strawberry can give you a bright red

How to dye your hair with Kool Aid

This process is best done on freshly washed hair that has been completely dried. To finish the prep, make sure to comb out your hair and if there’s any that you don’t want colors, pull them up in an elastic or clip. We only did the underneath of my daughter’s hair, so I pulled the top layers up into a top knot to keep them from reaching the color.

Also, put your child in an old t-shirt that you don’t care about getting colored. The hair will drip and could possibly dye the shirt they are wearing. Also, I would recommend gloves if you don’t want your fingers to also be the color of the hair!

add temporary hair color to your hair using kool-aid

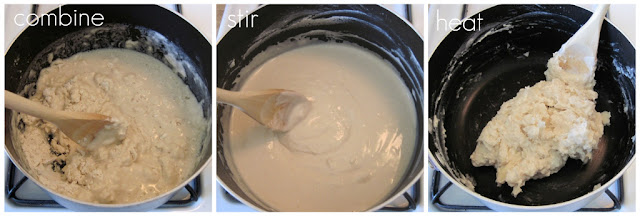
Mixing the Kool Aid dye

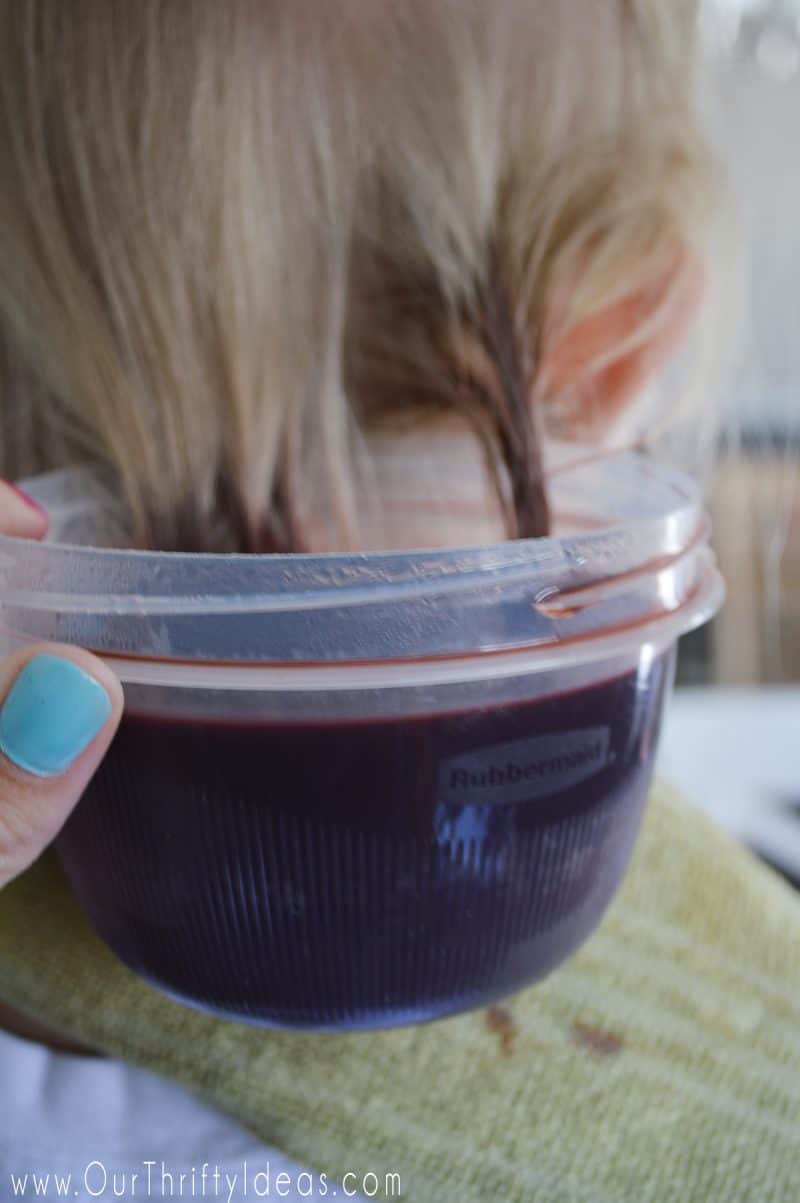
Combine your Kool-Aid packets and water in a pot and heat on medium-high heat until boiling. Boil for 1 minute then remove from the heat. Pour your mixture into a heat resistant cup or bowl. Depending on how much hair you want colored will determine how much liquid you want. I started with all of it in a bowl but quickly took some out because I didn’t want to risk coloring the whole hair strand as we only wanted a few inches colored. Keep in mind that the color will creep up the hair strands, so dip it about 1/2 inch less than you want to be colored.

Kool Aid Dye TIP

Adding a few drops of conditioner to the hot water and  Kool-Aid will help the color permeate the hair more evenly. It also makes the mixture less runny and easier to handle.

add temporary hair color to your hair using kool-aid

How long do I leave the Kool Aid on the hair?

I did her hair in 3 sections. Dip them in the color and let them soak for about 15 minutes. Darker hair may need 20-25. This is a perfect time to put a movie on and let them sit and watch while you hold their hair in the color. Because of how light my daughter’s hair is, we only kept the hair in for about 5 minutes and it still got a very vibrant color! Once the strand is done, ring it out with an old towel to avoid drips and move on to the next section until all is complete.

add temporary hair color to your hair using kool-aid

Once everything is colored where you want, it’s time to dry it. Blow it dry using a comb to brush out any tangles. Just know that for the first little bit the hair will be a little stiff or sticky feeling.

Kool Aid Hair Dye

After you blow it dry, the best thing to do is to use a hot straightening iron to set the color. Just a quick run over the hair will do fine. As soon as I was done, I took a damp cloth and wiped down the heating pads to remove any residue that may have transferred.

add temporary hair color to your hair using kool-aid

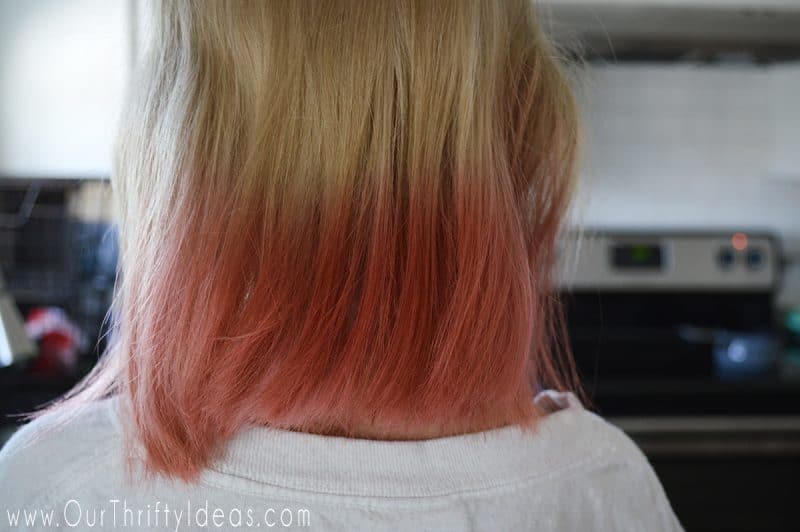
Now style the hair as you normally would, and you are all done!!!

This Kool Aid hair dye is not a permanent dye, but depending on the hair, could last a few days or maybe a few weeks. It’s a fun thing to do with your little ones who want a little personality in their do!

How to remove Kool Aid Hair Dye

Depending on how often you wash your hair the Kool-Aid will naturally fade in about two-three weeks. If you want it out sooner try this!

Boil a pot of water on the stove. Pour the boiling water into a heat safe container. To the water add 2 Tablespoons of baking soda and stir to dissolve. Dip your hair into the water for about 30 seconds. You should instantly see the dye coming off. Hair may be dipped a few times if needed. This is extremely drying for the hair so be sure make to deep condition after.

add temporary hair color to your hair using kool-aid

Now you know how to dye your hair with Kool Aid.  What colors would your child want in their hair?

how to dye your hair with kool aid tutorial

I would love to know what fun and out of the norm activities you have planned with your little ones this Summer. Leave them in the comments below! I hope you learned how to dye your hair with Kool Aid and will try it out!  Look below for a few other fun Summer ideas I have on my blog Our Thrifty Ideas.


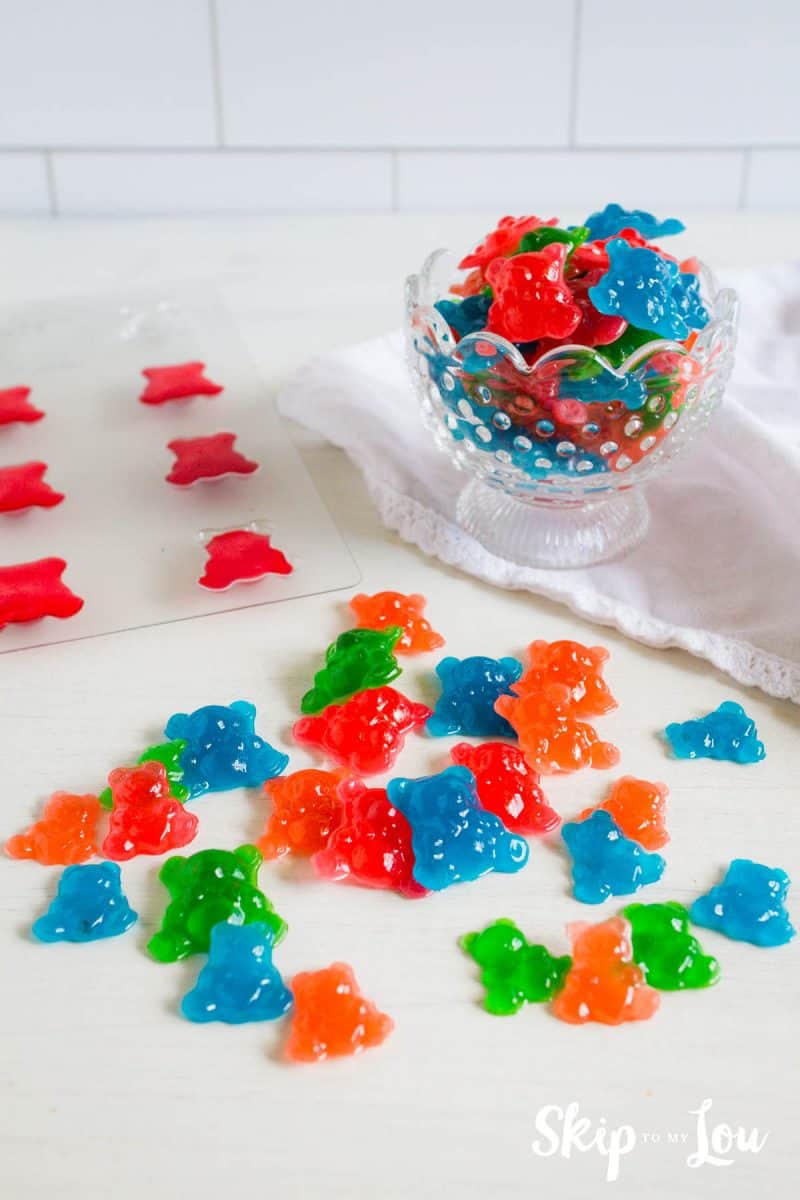
If you have extra Kool Aid you might like to make Homemade Gummy Candy.

how to make gummy bears

The post How to dye your hair with Kool Aid appeared first on Skip To My Lou.

Easy Girls Hair Style Pony Tail Climbers

$
0
0
c6ddddc9bdbee8c5522b9375d566d49b.jpg

This easy hairstyle for girls.  Ponytail climbers are perfect for swimming. It stays in place and keeps hair out of the face.  For more fun hairstyles you might want to try, check out this post on top ten hair braids.

Easy Girls Hair Style Pony Tail Climbers

easy pony tail climbers

This hairstyle is so simple you almost don’t need a tutorial. You can do this hairstyle in these simple steps.  Start with clean, damp hair. I prefer to work with damp hair when doing braids and other hairstyles. Separate and part into a ponytail. I like to do two ponytails for this style.

pony tail climbers

Simply put in in rubber bands one inch apart all the way down.  I like to use goody rubber bands because they stay in place and don’t slide around. You need the rubberbands to stay in place for this style to look good all day, especially after swimming etc.

easy girls hair style

This style is very forgiving, slide the rubber bands around to make even on both sides.  To prevent chlorine damage (we have blonde hair) you can even coat the hair in hair conditioner before a swim. This helps prevent tangles too! To remove I usually break the bands with clippers or small scissors, I have even broken them with my teeth in a pinch.

hair style for girls

For even more girls hairstyle ideas check out these posts below…

Easy summer hairstyles that make doing hair easy!  Summer hair hacks

Also, do you struggle with limp hair? Here is  How to add volume to your hair. These tips really work for me.

Don’t miss a thing! Sign up to get crafty ideas, recipes, sewing tutorials and more delivered right to your inbox. Follow Skip to My Lou on FB and Google+ to find out the latest news! Join me on Pinterest and Instagram for an extra dose of fun!


The post Easy Girls Hair Style Pony Tail Climbers appeared first on Skip To My Lou.

Summer Salsa Recipes

$
0
0
summer salsa

Here are some summer salsa recipes I am dying to try? Do you have garden fresh tomatoes? Making them into salsa is a way to preserve them all year long! I love fresh homemade salsa. Here are some recipes that caught my eye this week.

Summer Salsa Recipes

This easy pineapple salsa is vibrant, bursting with flavor and in possession of a power that makes it a very good with various cuts of meat.

summer salsa

Bright and fresh, this salsa is the best you’ve ever tasted!  It takes just 5 minutes to make, and it’s sure to “wow” anyone you make it for!

summer salsa

This is the best Pico De Gallo recipe and is made from fresh tomato, cilantro, onion, and jalapeno – makes the best salsa ever.

homemade salsa

This avocado salsa is super easy to make where you just need to dice some avocados, jalapenos, tomatoes, and onions, hit it with some lime juice, throw in some cilantro and finish things off with a touch of salt. Despite being so easy this salsa is so amazingly good with the cool and creamy avocados, the juicy tomatoes, tangy onions jalapeno heat and the freshness from the lime juice and cilantro!

salsa recipes

Strawberry mango salsa. The combination of sweet and spiciness is so good, you’ll want to eat this with a spoon! Make homemade cinnamon chips with tortillas and you have a perfect snack!

salsa

Stop by tomorrow for another Made by You Monday!I love seeing what you are working on and I would love to feature you here at Skip to my Lou.

Don’t miss a thing! Sign up to get crafty ideas, recipes, sewing tutorials and more delivered right to your inbox. Follow Skip to My Lou on FB and Google+ to find out the latest news! Join me at Pinterest and Instagram for an extra dose of fun!

The post Summer Salsa Recipes appeared first on Skip To My Lou.

Made by You Monday

$
0
0

It’s Monday show us what you’ve got. It is time to link up your crafty goodness! Please don’t forget to link back! — a text link at the bottom of your post, or link somewhere on your blog is okay!

made by you monday


By linking up to Made By You Monday. You give permission for one photo and a link to be featured in a post, and on social media.  This is to promote you and your site.

The post Made by You Monday appeared first on Skip To My Lou.

Personalized Note Cards

$
0
0
DIY Notecards

This post is in partnership with Adobe Photoshop Elements 2018. All opinions and ideas on how to make personalized note cards are my own. 

Create your own cute 3D personalized note cards to make your greeting cards extra special and heartfelt!  Adobe Photoshop Elements makes it so easy!

Personalized Note Cards Supplies

  • 8 1/2″ X 11″ white cardstock
  • envelope for 4″ X 6″ inch card
  • Computer
  • Photoshop Elements 2018 (download your free trial here)
  • Printer
  • Photo
  • 2 Dimensional flower embellishment (found at craft stores)
  • Pen
  • Glue or tape to attach the flower embellishment
DIY Notecard Supplies

How to Make a Photo 3D 

Use Adobe Photoshop Elements 2018 to create darling 3D personalized note cards.  In this quick video, I will show you how easy it is to use the Out of Bounds Guided Edit to make 3-dimensional looking note cards.  Adobe Photoshop Elements 2018 offers many Guided Edits that provide step-by-step instructions to make it easy to give your photos amazing effects. 

VIDEO

How to use the Out of Bounds Guided Edit in Adobe Photoshop Elements 2018

Choose the Guided mode at the top, then Fun Edits. Next, select Out of Bounds. We will use the Out of Bounds Guided Edit to make a subject pop out of the photo with this 3-dimensional effect.

Fun Edits Photoshop Text Edit


Open up a photo and select add frame in the right column. Click and drag the frame into place.  Position the frame so that part of the main subject is inside the frame and part remains outside. For my photo, I  want the arm to stay outside of the frame. Select the green checkmark to confirm.

out of bounds add frame

The screen will become gray outside of the frame.  Select the green checkmark to confirm.

outs of bounds tutorial

Use the selection tool to select the part of the image that you want to extend out of the frame.  Make sure to select a little bit of the area inside the frame too!

out of bounds selection tool

Select the Out of Bounds Effect and watch the magic happen. Change the background by adding a background gradient. There are many options from colors to patterns to choose from.  I am choosing white to make the arm really pop.

A small, medium or large shadow can be added for more dimension.

photoshop elements out of bounds edit

Choose file, then print.

printing notecard photo

Select portrait orientation and then 4 X 6 as the print size.  Drag the photo to the left of the box with the hand, then with the arrow drag the entire box to the bottom of the page. This will allow enough paper to turn the photo into a folded notecard.

printing layout instrucitons

Print in color on heavy cardstock. Fold and trim to size.

trim notecard

Add a flower embellishment with a bit of adhesive.

flower embellishment on notecard

Draw a stem…

DIY notecard drawing stem DIY notecard with flower embellishment

This is a great project for kids to get involved.  Have them write a little note to make the notecard extra special! Who wouldn’t love to open a card with such a sweet smile and handwritten sentiment?

handwritten note

It is also easy to select Expert mode at the top and add a custom greeting with the type tool!

custom note cards

Now you can hand deliver flowers anytime.

personalized notecards

I love how easy it is to edit my photos without loads guesswork and professional training! Adobe has made it possible for me to easily edit like a pro and make cool stuff. Did you see my Travel Memory Shadow Box,  DIY Custom Watercolor Photo Canvas and DIY Fabric Paper Printed Notebook Cover?

You can try out Adobe Photoshop Elements 2018 for free. Download your free trial here.

The post Personalized Note Cards appeared first on Skip To My Lou.

Detox Water to Stay Healthy and Hydrated

$
0
0
detox water

Have you tried Detox Water? Everyone knows that drinking more water is good for you.  Your body needs it– plain and simple. Add some fruit and or essential oils and you can also detox your body!

detox water in glass

Reasons to Drink More Water

Energy!  Did you know that drinking more can actually help your energy level?  When we are dehydrated, our body feels fatigued and can also feel weak.  Drinking enough water every day will help you maintain clear thinking and better concentration.

Weight loss!  When our body is hydrated it allows our organs to work at their optimal level.  This increases metabolism and allows the body to burn more fat. Plus, water has zero calories, so if you are substituting a glass of water for your favorite drink or soda, you will be saving a bunch of extra added calories!

Healthy skin! Drinking water hydrates your skin.  This seems especially important for me in the winter when I seem to have such dry skin. Water helps diminish the appearance of wrinkles (that’s a huge bonus!) and it flushes toxins out of your body.

Nutrients!  Water allows nutrients and oxygen to travel to your cells and organs.  It is vital in keeping our body healthy at it’s most basic level–the cellular level.  Water also regulates our body temperature, removes waste, and helps protects our joints and organs.

Lemon Vitality Essential Oil for Dextox Water

Each year, I start my water resolution off with a bang and a need for an extra roll or two of toilet paper each week!  I tend to slow down on my water and return to higher calorie substitutes by February 1st (I know–It’s a shameful pattern!)  The one thing I have realized over the years, is that I just crave the taste.

This year, I have found a great secret weapon.  My family has been using essential oils for almost everything under the sun.  We have been experimenting with homemade cleaners, mood-lifting room sprays, and new recipes using ingestible essential oils.  We’ve been replacing some of our more toxic products with some alternatives, using  Young Living Essential Oils.  It is a company that we trust, and you can read more about that by clicking here.  I also suggest that you don’t ingest just any essential oil.  You need to check out the safety before you put it in your water or on your skin!

lemon essential oil

I have been adding one to two drops of Lemon Vitality to my tumbler full of ice water, and I am loving it!  Lemon Vitality (from Young Living) contains limonene.  It has a fresh citrus flavor and makes a great addition to food–and especially to plain water!  I have found that I also really like the lime, peppermint, and grapefruit vitality oils in my water too.  I’m not a doctor, health practitioner, or oil guru.  I am just a mom reading research and trying recipes to determine what works for my family!

Detox Water Health Benefits

Studies have shown that detox water can help aid in weight loss, help flush toxins out of the body, and can also help with general wellness and a healthy digestive system.  Whether you are creating detox water with essential oils or cutting up fruit and vegetables to infuse your water, here are some great tips.  The flavors can be mixed together or can be drunk on their own.

detox water in large jar

Detox Water Benefits

  • Grapefruit:  As an oil or cut up fruit.  When added to your water it gives it a refreshing-tart taste.  It is known to have fat-burning enzymes that can help aid weight loss.  Contains Vitamins A & C.
  • Peppermint:  As an oil or add a few mint leaves.  Mint water helps aid with digestion, bloating, and upset stomachs. Gives you fresh breath and can help you feel invigorated.
  • Cucumber:  Sliced up into the water.  Cucumber water has diuretic properties that help to guarantee that most of the moisture in your body will be flushed from your system as quickly as possible.
  • Lime and Lemon:  As on oil, or sliced up.  Lemon water helps relieve bloating and ease indigestion.  Great way to enjoy the flavor of lemonade or limeade without all of the extra sugar.
  • Ginger:  Sliced up.  Helps calm the stomach.  Has anti-inflammatory properties, can help with fat-burning, and boosts the immune system.
  • Orange.  As an oil or sliced up.  Citrus fruits contain Vitamin C to help boost the immune system.  Helps eliminate toxins and flush the body.

Detox Water Recipes

Now don’t worry if you don’t have all the fruit on hand. A drop each of the essential oils will give you the same amazing benefits!

detox water

Detox Water

Whip up this simple recipe to stay hydrated and give your body loads of healing benefits!

  • 1  lemon (sliced)
  • 1/2  cucumber
  • 2 inches of fresh ginger (peeled and sliced)
  • a couple sprigs of mint leaves (about 15 leaves)
  1. Fill a half gallon glass container with fruit and mint leaves and cold water.
  2. Let steep for an hour. Keep in refrigerator.

Want more citrus flavor?  Add in a sliced lime and or orange. Don’t hesitate to make this recipe your own.  If you like less ginger and more cucumber it is easy to adjust this recipe and still get amazing health benefits!

How long do you let detox water sit?

You might wonder how long you can leave the fruit in the water. Fruit-infused water is best after two-four hours or after it has had a chance to infuse overnight. Under refrigeration lemon slices in water can keep for up to three days. The water can be replenished and lemon slices reused.  I remove the cumber and mint and add fresh when doing this.

lemon detox water

The possibilities for detox water recipes are endless and you can mix and match to create amazing flavors.  I love to mix cucumber and peppermint or orange and ginger.  I often add berries, such as raspberries, blackberries, and strawberries, when they are in season.  They go great with cucumbers and mint too!  I love drinking the infused waters and I can’t imagine ever going back to drinking only plain water again.  I often mix up an entire pitcher of detox water and keep it cold in the fridge so I can have a refreshing glass as soon as I am thirsty!

fruit infused water

Drinking water with essential oils isn’t the only way to enjoy their health benefits. There are so many ways to use essential oils!  This peppermint sugar smells delicious and makes your skin silky soft. I have included a cute DIY printable label to make it into a sweet gift, but I would make an extra batch to keep one for yourself too! If you want to know another way we use essential oils at our house try this stinky shoe spray.

I love these Essential Oils if you want to know more! You will always find them diffusing in our home.

young living difusser


The post Detox Water to Stay Healthy and Hydrated appeared first on Skip To My Lou.


Easy Ways to Organize Your Pantry

$
0
0
organize your pantry

This post contains affiliate links.

Here are ten easy ways to organize your pantry. It doesn’t take long for my pantry to get out of hand (it’s a small space)! Rather than dream of large spaces try these storage solutions to save space and make everything easy to find! Big or small; it will function better!

organize your pantry

Easy ways to organize your pantry

This lazy susan is something I use in cupboards and my fridge to make everything easy to reach and see!

lazy susan

Cans take up a lot of them room in my pantry! Consider a rotating can organizer. Cans don’t get lost in the back and they don’t waste space. You might even consider a larger can organizer to keep in your garage and refill the one in your pantry as needed. It will save a lot of space!

can organizer

This over the door hanging rack takes a completely unused space and makes it useful! Easy to install and easy to see everything right in front of you.

pantry organizer

These stackable containers make it easy to see what you have and are easy to stack and keep everything organized. Throw out all those half empty boxes!

pantry

A place for everything! If every time you open your cupboard you are battling things falling out, try this handy way to stack and organize your plastic wrap, bags and foil!

pantry storage


Those packets that you use for all your recipes (lipton onion mix) are easy to find and have a handy place with these little storage baskets!

These large baskets with handy handles make it easier to find and especially grab things! Take smaller items and group them together to make things easy to find and organized.

You can get more space with these 3 tier racks! Simple way to triple your space in no time.


Make a drawer! Any cabinet can have a pull out drawer with this handy product!

This Spice Organizer has a place for everything! Easily pull out items as you need them. Everything has a place.

racks

For more household tips. Check out this post on how to keep fruit longer or this post on how to unclog your garbage disposal.

Don’t miss a thing! Sign up to get crafty ideas, recipes, sewing tutorials and more delivered right to your inbox. Follow Skip to My Lou on FB and Google+ to find out the latest news! Join me at Pinterest and Instagram for an extra dose of fun!

The post Easy Ways to Organize Your Pantry appeared first on Skip To My Lou.

Summer DIY Ideas

$
0
0
DIY

Got some time this summer? These summer DIY ideas are perfect.  I like to do my projects in the summer because I can work outside and there is a lot more room to paint, etc when I can be outside. I do have to watch the temperature though.  Here are a few DIY ideas that stood out to me from Made by You Monday this! So many greast ideas.

Summer DIY Ideas

Make this mason jar organizer. Makes a fun pencil holder for school supplies and it also makes a wonderful utensil holder for your backyard summer barbecue too! 

organize


You won’t believe this cute idea. Full step by step tutorial to install rain gutter bookshelves. It makes a perfect addition to any kid’s room.

DIY

This cheap and easy hanging garden tool organizer keeps all your hand tools, gardening gloves, twine and more in one place on your garage or shed wall! I absoltely need this idea.

Learn how to clean outdoor cushions and keep them looking like new with these simple tips and tricks! My cushions take a beating each year so I will be using those tips for sure.

clean

If you are looking for a craft apron, this may just be the one for you. This iron-on apron is very simple to make.

Be sure to stop by tomorrow for another Made By You Monday! I would love to feature you.

For more great tips and ideas check out this post on how to organize your pantry or this post on how to make your grill non stick, naturally!

Don’t miss a thing! Sign up to get crafty ideas, recipes, sewing tutorials and more delivered right to your inbox. Follow Skip to My Lou on FB and Google+ to find out the latest news! Join me at Pinterest and Instagram for an extra dose of fun!

The post Summer DIY Ideas appeared first on Skip To My Lou.

Made By You Monday

$
0
0

It’s Monday show us what you’ve got. It is time to link up your crafty goodness! Please don’t forget to link back! — a text link at the bottom of your post, or link somewhere on your blog is okay!

made by you monday


By linking up to Made By You Monday. You give permission for one photo and a link to be featured in a post, and on social media.  This is to promote you and your site.

The post Made By You Monday appeared first on Skip To My Lou.

My Favorite Homemade Brownies

$
0
0
best-brownies.jpg

I love the smell of homemade brownies. Waiting for these chocolatey brownies to cool is optional!  These Homemade Brownies are extra chocolatey and made completely from scratch. With this homemade brownie recipe, you’ll never need a box mix again! We love these rich brownies with dense, fudgy middles and crinkly tops. They are so simple to make and they taste amazing.  You certainly will be able to taste the homemade difference.

homemade brownies

Homemade Brownies

If you are looking for a go-to brownie recipe to add to your baking repertoire, we think this is the BEST homemade brownies recipe out there. It is sure to cure all those cocoa cravings and can be mixed up in minutes.  I know what you may be thinking–you are too busy for homemade brownies AND the box is just so convenient.  Take the homemade challenge and once you taste the difference, you won’t be going back to the box.

The best part is the recipe goes together quickly and fills a 12 X 18 pan so it feeds a crowd.  The ingredients are simple and should become a staple in your pantry.  You never know when you might need a quick dessert for unexpected company, and these brownies will certainly make them feel like special guests!  It is the perfect dessert to take to a potluck or a picnic.  Children AND adults will be coming back for a second brownie as this recipe stands above the rest.

Brownies from Scratch Tips

  • Refrigerate the brownies to make cutting easier
  • Don’t overmix the batter and you will get moist fudgy homemade brownies
  • Spray the baking pan with cookie spray, then line with parchment paper and spray again.  Once brownies are chilled, they can be removed from the pan then cut into squares.
  • The brownies can be made ahead and frozen. Wrap tightly with plastic wrap and foil to keep them fresh.

Homemade Brownies

My most favorite brownies and they feed a crowd!

  • 2 cups all purpose flour
  • 1 1/3 cups unsweetened cocoa powder
  • 1 teaspoon salt
  • 8 large eggs
  • 4 cups sugar
  • 1 pound 4 sticks unsalted butter, melted
  • 1 tablespoon plus 2 teaspoons pure vanilla extract
  • 2 cups coarsely chopped walnuts (I omit)
  • 2 cups 12 ounces semisweet chocolate chips
  1. Preheat the oven to 325 degrees.
  2. Lightly grease and flour a 17 by 12 by 1-inch baking pan (I use a 12″ X 18 “X 1” pan) and set aside. (I line pan with parchment paper then spray with cooking spray)
  3. Sift together the flour, cocoa powder, and salt in a bowl and stir to mix.
  4. Cream together the eggs, sugar, butter and vanilla in a separate bowl until well blended.
  5. Add the flour mixture to the butter mixture and mix just until all the dry ingredients are moistened. Do not over mix.
  6. Fold in the walnuts and chocolate chips and stir to blend. Spread the batter evenly into the prepared pan.
  7. Bake 35 to 40 minutes, until the brownies are firm to touch. They will be slightly soft in the center when tested with a toothpick. Remove from the oven and cool about 40 minutes before cutting.
  8. Trim the edges and cut into 2 1/2 by 3-inch bars.

To make cutting the brownies easier, refrigerate brownies a couple of hours or overnight. Lift parchment to remove brownies from pan before cutting.

From Foster’s Market Cookbook

More Brownie Recipes

We would like to believe we are brownie connoisseurs! We love baking brownies (and eating them)!  Hopefully, these recipes will inspire you to teach the next generation about homemade recipes and cooking from scratch.  The times spent in the kitchen together baking brownies will certainly be part of making some wonderful memories.

Brownies with Chocolate Rice Krispie Topping peppermint brownies

Looking for some unusual but delicious brownie recipes?  Try these brownies with a crunchy topping. They are super moist and topped with creamy marshmallow and chocolatey rice layers.  If you like the combination of chocolate and peanut butter, these brownies are three layers of perfection and the chocolatey rice layer gives them a unique texture.  I guarantee they won’t last long once they are sliced into squares! YUM!

Peppermint Brownies in a jar make a delicious and thoughtful homemade gift!  They would make a great Christmas gift for a teacher, or just about anyone on your list.  They are easy to whip up a bunch at a time.  The layered ingredients look very festive,  and the jar makes them simple to give (and keep on hand for extra gifts!)

If you love the combination of chocolate and mint, these Junior Mint brownies are gooey and minty!  Candy added to a brownie…What’s not to love?  They are the perfect treat for a movie night.

No time to make up a pan of brownies but still need a chocolate fix? This chocolate mug cake is a family favorite for sweet cravings! It takes only a few minutes to have a dense fudgy treat!  I like it baked just at 1 min 45 seconds. This leaves a bit of warm chocolate batter just like a lava cake. YUM!

chocolate mug cake

The post My Favorite Homemade Brownies appeared first on Skip To My Lou.

AWESOME Minute To Win It Games

$
0
0
3.jpg
Minute To Win It Games are fun and can be played at any party or big group get together.  It is also easy to come up with new variations of games, you can find new ideas all over the internet.  Some of our favorite party recipes (because everyone love games and food) are monster cookie dough dip,  ultimate Chex mix, and this buffalo chicken dip!  Make these recipes and get the supplies for the games and you will have a smashing good party!

Minute To Win It Games

Here are a few variations of minute to win it we have tried and love…
Minute to win it games

Minute To Win It

Do you have a group of adults and children you need to entertain? Minute to win it is a high energy game you can play with adults and children of almost all ages. It is perfect for any party because it is easy to create and have fun with! There are so many ideas for games be sure to search the internet for even more.  Most of the ones below we have tried and had great success (so I share them with you). Most of the challenges work best with 2-3 players at once.

Here is a list of supplies you will need for these five games below… (you probably have a lot of these items already)

  • Cookies (store bought work best for stacking)
  • Straws (we love the fun striped ones pictured below)
  • Pennies
  • ping pong balls
  • red cups
  • m&m’s
  • bowl
Be sure to have snacks and other things to do for those waiting for their turn. Games like Uno, Catch Phrase, and puzzles are great to have on hand to keep everyone playing and having fun. We also love a portable blue tooth speaker for music!

Minute To Win It Games For Kids

Cookie Face

This game is harder than it sounds but a total classic for this game.

Simple place a cookie on their forehead, and the goal is to get the cookie into your mouth using only your facial muscles in under 1 minute. No hands!

Stack it Up

Each player must stack as many pennies as they can in under a minute using only one hand.

Suck them up

Players place a straw in their mouth and suck them up to transfer a pile of 25 M&M’s from one plate to another in under one minute. Only one hand may be used to hold the straw.

Stack Attack

Players Stack a pile of 21 Cups then place them back into a single stack in under a minute.  Two players can compete at a time.

Scoop it up

Using only a spoon in your mouth, transfer 6 ping pong balls from one bowl to another in less than a minute.  No hands! You can use your hands are only allowed if you drop the ping pong ball, and then they can be used to place the ball back into the original bowl for another transfer attempt.

More Minute to Win it Games for fun!

  • Keep It Up

Have an individual or a team keep a balloon afloat for one minute by only using their heads, toes, etc. or whatever rule you make up.  When the balloon touches the ground, they’re out of the game. The last person or team with a balloon afloat wins.

  • Junk in the Trunk

Attach an empty rectangle tissue box around the waist and fill it with 8 ping pong balls. Now shake and move about to try to remove the ping pong balls.
  • Bobble Head

Attach a pedometer head of each player and have them move their head back and forth quickly to achieve as many “steps” as possible before the timer runs out.

  • Wall Bounce

Players bounce a ping pong ball off the wall and into a bucket. Whoever has the most balls in the bucket at the end wins.

FUN Party Games

If you are looking for more fun ways to have fun at a party try the Newlywed Game or Would You Rather.  These family games are perfect for a game night. If you have a break in the conversation you are sure to get a laugh with one of these kids jokes.

The post AWESOME Minute To Win It Games appeared first on Skip To My Lou.

Camp Friends Autograph Pillow

$
0
0
autograph pillow

Camp friends autograph pillow is a fun way for kids to remember their special friends from camp. A simple iron on transfer makes this a quick and easy DIY project. You might also want to tuck in some inspirational quotes for teens.
autograph pillow

DIY Autograph Pillow

This is a super easy DIY project that has great results. A simple iron-on will allow kids to make their very own autograph pillow that they can color sharpie markers and collect autographs!

gilr with camp friends autograph pillow

Autograph Pillow Supplies

camp friends color camp friends pillow supplies

Download the camp friends printable.  Print according to manufacture directions onto iron-on transfer paper.  Make sure to select to print in mirror image or reverse.  It should print backward so when it is ironed on it is printed correctly.

printed camp friends in reverse

Cut around the design.

camp friends cut out

Iron-on to the pillow.

iron on camp friends printable

How fun to have special autographs and sweet messages from special friends.

girls autographing camp pillow

Camp Friends Autograph Pillow Tips

  • I purchased pillow protectors with a zipper.  They were about $2.00 at Wal-Mart.
  • I bought new pillows and left them in the plastic packages so as the girls drew on the pillows they marker wouldn’t bleed through to the back of the pillowcase.
coloring camp friends pillow girls signing camp friends pillows

If you want to send your camper a special care package this is what I have sent my daughter Bella the last two years.  I made sure she knew we were thinking about her by sending a few little gifts and treats paired with cute sayings and words of encouragement.

Summer Camp Care Package

sleep away camp gift ideas

Camp Care Packages

summer camp care package

If you need to send a friend some cheer this idea is sure to brighten their day! It doesn’t take much to encourage someone.

Care Package

care package

This is a perfect feel better soon gift for a friend.

feel better soon care package filled with candy


The post Camp Friends Autograph Pillow appeared first on Skip To My Lou.

How many cups in a quart? {FREE Printable chart}

$
0
0
Conversion Chart

This printable measurement conversion chart will keep you from saying, “how many cups in a quart?”

{Conversion Chart} download

Conversion Chart

How many cups in a quart?

I often find myself in the kitchen and can’t remember those simple measurement conversions. I will be in the kitchen and need to know things like how many cups is two quarts of water. This printable conversion chart will help you always know the answer is 8 cups.  Just download, print and hang inside your kitchen cupboard and always have the answer handy!

how many cups in a quart

Here is a list of the most common cooking conversions.  From how many ounces in a cup to how many cups in a quart you will find the answers!

How many cups are in a gallon?

There are 16 cups in a gallon

How many quarts in a gallon?

There are 4 quarts in a gallon.

How many cups in a quart?

There are 4 cups in a quart.

How many pints in a quart?

There are 2 pints in a quart.

How many cups in a pint?

There are 2 cups in a pint.

measuring spoons how many tablespoons in a cup

If only the questions stopped at how many cups in a quart! There are so many more conversion questions when cooking. Here are a few more answers to common cooking measurements.

How many tablespoons in a cup?

There are 16 tablespoons in a cup.

How many tablespoons in a half cup?

There are 8 tablespoons in a 1/2 cup.

How many tablespoons in a third of a cup?

There are 5 tablespoons plus 1 teaspoon in a 1/3 cup.

How many tablespoons in a fourth of a cup?

There are 4 tablespoons in a 1/4 cup.

How many tablespoons in an eighth of a cup?

There are 2 tablespoons in a 1/8 cup.

How many teaspoons in a tablespoon?

There are 3 teaspoons in a tablespoon.

measuring cups how many ounces in a cup

How many ounces in a tablespoon?

1 tablespoon is 1/2 ounce

How many ounces in a fourth cup?

There are 2 ounces in a 1/4 cup.

How many ounces in a third cup?

There is 2.6 fluid ounces in a 1/3 cup.

How many ounces in a half cup?

There are 4 ounces in a 1/2 cup.

How many ounces in a three-fourths cup?

There are 6 ounces in 3/4 cup.

How many ounces in one cup?

There are 8 ounces in 1 cup.

How many ounces in a quart?

There are  32 ounces in 1 quart (4 cups).

How many ounces in a gallon?

There are 128 ounces in a gallon.

Cheat Sheet

Here is another handy chart to keep in your kitchen if you are a fan of the Instant Pot.  This little cheat sheet always lets you know quickly how to cook different items in you instant pot.

{Instant Pot Cheat Sheet}

instant pot cheat sheet

Now you know how many cups in a quart, pint, gallon!

The post How many cups in a quart? {FREE Printable chart} appeared first on Skip To My Lou.


Thanksgiving Coloring Pages

$
0
0
Thanksgiving Coloring Pages

These darling Thanksgiving coloring pages will keep kids busy and entertained at your Thanksgiving dinner. Coloring pages for kids are a great way to make sure they have fun at your gathering. Guests will also love these printables:

Thanksgiving Coloring Pages

I love this coloring page because it encourages everyone to give thanks!  There is plenty of room to make a really long list of all your blessings! We all need to be reminded of all the amazing blessing we have. Writing them down helps us focus on what really matters. What a great habit to start early with our children. We can even help our children be healthier by being grateful. 

According to a 2012 study published in Personality and Individual Differences, grateful people experience fewer aches and pains and they report feeling healthier than other people. Just one of the many benefits of being thankful!

Thanksgiving Coloring Page

Thanksgiving Coloring Pages


Turkey Jokes

We all need a good laugh and these turkey jokes will make sure you hear loads of laughter and giggles with this turkey coloring page.  These turkeys have some funny jokes to share. Kid’s jokes are a great way to get kids and adults interacting.  Who doesn’t love a good joke!

Turkey Jokes Coloring Page

turkey jokes coloring page

Turkey Coloring Pages

Look at this beautiful turkey just waiting to be colored!

Free Turkey Coloring Pages for Thanksgiving - illustration by St

More Turkey Coloring Pages. Enjoy all these free Turkeys to color. There is even a worksheet to help kids learn how to draw a turkey.turkey coloring page

I hope you love all these free Thanksgiving coloring pages. There is more! Don’t miss all the free coloring pages and graphic organizers.  The Year in Review coloring page makes a wonderful keepsake!

Free Coloring Pages

We love free coloring pages! Have you seen these? I hope you will take a look around at all the coloring pages.  So many ways for kids to spend their free time and many of the pages help them record their special moments!

2016 Year in review printable christmas coloring page Father's Day Coloring Page Kansas Day freensunflower coloring page Mandala 13 free printable coloring bookmarks

Year In Review Coloring Page
Christmas Coloring Page
Father’s Day Coloring Page
Sunflower Coloring Page
Mandala Coloring Pages
Bookmarks to color

The post Thanksgiving Coloring Pages appeared first on Skip To My Lou.

The CUTEST Free Turkey Coloring Pages

$
0
0
Turkey Coloring Sheet printable

Get kids excited about Thanksgiving with these free turkey coloring pages. Kids from young to old will have fun coloring these super cute Toms! When you have had your fill of turkey be sure to check out these Thanksgiving coloring pages and don’t miss this fun Thanksgiving Trivia Game.

Turkey Coloring Pages

We love coloring! Click the links above the pictures to download.

{Turkey Coloring Page} Download

turkey coloring pages

Turkey coloring pages make for a quick Thanksgiving craft project. The best part is when the coloring is done these turkey coloring pages can be hung around the house for an instant Thanksgiving decoration. How fun is that!?! Kids love to see their handiwork on display.

{Fancy Turkey Coloring Sheet}

Turkey Coloring Sheet printable

This simple turkey coloring page is perfect for little hands!

{Modern Turkey Coloring Sheet}

modern turkey coloring page

This turkey coloring sheet is for a friendly turkey that is sure to make a kid smile.

{Turkey Cartoon Coloring Page}

cartoon turkey coloring page


This turkey worksheet is a fun activity that will help kids learn how to draw a turkey! Coloring pages and worksheets are a great way to keep kids busy and entertained during family dinners! Set out the free coloring pages and a variety of crayons and colored pencils and you are set! The kids will then have something to take home to remember the event!

{Turkey Worksheet}

turkey worksheet

Look at these cute turkeys!  This coloring page lets everyone take a minute to think about and then record what they are grateful for! Finding opportunities for my family show their gratitude is important to me. This sheet is perfect to set at EVERYONE’s plate at your Thanksgiving dinner.

Thankful Coloring Page

Thanksgiving Coloring Pages

If you are a fan of coloring be sure to see all my free coloring pages! There are loads of the cutest graphic organizers from back to school to the year in review.

The post The CUTEST Free Turkey Coloring Pages appeared first on Skip To My Lou.

Super Easy DIY Cat and Dog Bandanas

$
0
0
dog bandanas

Have you ever wondered how to make dog bandanas?  If you are a pet lover you can make this Furry Fan Pet Bandana for your dog or cat.  It makes the perfect gift for an animal lover. It is so clever how these dog bananas slip over the pet collar making it easy and comfortable for your pet!

pet bandanas

Cat and Dog Bandanas

This holiday season, don’t overlook your favorite furry fan – even your cats and dogs can show their spirit! Today I want to share with you a  simple and fun pattern for making cat and dog bandanas. Your Fido will flip for it or, in my case, Chloe the cat!

bandana dog collar

You will need the following supplies to make a bandana dog collar!

  • 1 yard of your favorite team’s fabric!
  • Coordinating Thread
  • Cat or Dog collar
  • Erasable marking pen or pencil
  • Hard edge ruler
  • A piece of paper (size will vary by how big your furry friend is)

How to make dog bandanas

Let me show you how to make a dog bandana. This easy pattern works for any animal that wears a collar.

dog bandanas

1. Measure over from the fold for 1/2 the length of your collar. Mark. Use your ruler to draw a diagonal line from your mark down to the fold, creating a triangle shape. How big the triangle is will depend on how big your animal is. For instance, the triangle for our dog collar (for a golden retriever) was 11.5″ long along the fold line. However, the triangle for the cat collar was 6″ along the fold line. Cut out the triangle and open the paper out.

step by step how to make a dog bandana

2. Place your pattern piece on the right side of your fabric.  Note, when you are cutting out your scarf, consider the print placement. Cut out two triangles from your pattern piece.

bandana pattern

3. Place both triangles right sides together. Pin and stitch with a 1/4″ seam allowance along the top edge. Be sure to backstitch! Fold open the scarf and press the seam open.

Step3

4. Measure the width of the largest buckle or closure on your pet’s collar. Add 1/2″ to that measurement. Using this measurement, make a mark along the corner seam. Fold in the corner edge to that mark. Press and pin. Repeat on the other side. Stitch with 1/4″ seam allowance. Press.

Step4a step4B

5. Fold right side together. Pin along the two remaining open edges. Stitch with a 1/4″ seam allowance. Trim allowance close to the stitching line.

Step5

6. Turn scarf right side out through the collar opening. Press. Use your marking pen to draw a line from the bottom of both short lines of stitching to form the collar casing. Stitch along the line. Press.

Step6

7. Topstitch along the bottom edges of the bandanna with a 1/4″ seam allowance. Have fun choosing your thread colors. I used navy blue topstitching on the scarf above and white on the one below.

Step7

Thread your collar through the open casing, and dress your pet up in its new favorite scarf!

pet colar bandanas dog bandanas


Amy Barrickman the owner of a pattern company, Indygo Junction, She is a big fan of giving (and receiving) handmade gifts. When it comes to gift giving, you can’t go wrong giving presents that feature your family’s favorite team. There are so many fun options – you could make pajamas for your kids,  an apron for your grillmaster, or even some organizational baskets.

The post Super Easy DIY Cat and Dog Bandanas appeared first on Skip To My Lou.

One Pan Dinner Recipes

$
0
0
one pan dinner recipes

Summertime meals need to be simple for my family. With the heat in my area, I prefer to not heat up the house with the oven. These one pan meals make dinner time fast, easy and delicious. Here is a few recipes I would love to try this week.

One Pan Dinner Recipes

I love easy chicken recipes, especially when they result in a tasty dinner that the whole family absolutely loves! And it doesn’t get any easier or more delicious than this one pan chicken cordon bleu, made in one skillet and ready in 25 minutes or less!

one pan dinner recipes

Skillet lasagna is a quick and easy dinner idea that you can make it one pan. Everything in layered into one skillet for a simple way to cook lasagna.  No need to spend hours when you can whip this up in about thirty minutes. 

skillet lasagna

This is a quick and simple meal that can be made in less than 30 minutes. Penne pasta is covered with a creamy sauce with mushrooms, Parmesan cheese, onions, bacon, and garlic.

penne-with-cream-sauce.jpg

Cheesy, easy and something you can always keep on hand this one pan ziti recipe will become a regular in your weekly rotation!

one pan dinner recipes

Got a busy night? This one pot beef stroganoff will make meal planning a breeze.

one-pot-beef-stroganoff.jpg

For more great meal ideas check out this post on easy skillet meals.

Don’t miss a thing! Sign up to get crafty ideas, recipes, sewing tutorials and more delivered right to your inbox. Follow Skip to My Lou on FB and Google+ to find out the latest news! Join me at Pinterest and Instagram for an extra dose of fun!

Be sure to stop by tomorrow for another Made By You Monday. I love seeing what you are working on and this is my best chance to feature you.

The post One Pan Dinner Recipes appeared first on Skip To My Lou.

How to make playdough

$
0
0
how to make homemade playdough

Let me show you how to make playdough. It is a great kid’s activity!  It is easy enough for kids to help with, only takes about 10-15 minutes, and gives you comparable results to store bought playdough.

How to make playdough

You probably have all the necessary materials on hand in your pantry. No need for store bought playdough anymore! You are going to love this playdough recipe! It is soft and smooth just like the real thing.

how to make homemade playdough

Homemade Playdough Recipe

  • 1 cup flour
  • 1 cup warm water
  • 2 teaspoons cream of tartar
  • 1 teaspoon oil
  • 1/4 cup salt
  • food coloring

playdough recipe

How to make homemade playdough step by step

When in this process you allow your kids to assist is entirely up to you.  Younger children can mix dry ingredients, older kids can stir (supervised) at the stove top, and adding food coloring is fun for everyone.  My son is under two, so he mainly helps me with the “playing” part.  Please supervise your children and use caution with the stove and hot dough. If you are concerned about the stove and hot dough, keep reading I have a no-cook recipe at the bottom. Either way you will know how to make playdough and it will be oh so soft and silky!

how to make playdough

  1. Combine all ingredients (except food coloring) in a medium-sized saucepan.
  2. Stir over medium heat until smooth.
  3. Stir continuously until the dough balls (about 1-2 minutes).  Remove from heat.

homemade playdough recipe

  1. When the dough is cool enough to handle, knead until smooth.
  2. Form into a ball.
  3. Divide into as many colors as you’d like to make.  A single batch makes a good amount for four colors.

homemade playdough recipe

  1. Add food coloring to the divided dough.  Gel food coloring works quite well.  I have not tried liquid food coloring.
  2. Knead the food coloring into the dough. To protect your countertop, knead over wax paper.  To protect your hands, wear plastic or rubber gloves if you have them (you could also put the dough and food coloring inside a ziplock bag and have the kids squish it around inside).
  3. When the dough is a consistent color, ball and set aside.

homemade playdough

  1. Repeat with the rest of your colors.
  2. Put the dough in separate containers.  Toddler-sized snack containers are a good size, and I have also wrapped the colors individually in wax paper and stored in zip-lock bags.
  3. Store in an airtight container until ready to use.  It will stay soft for several weeks if stored airtight. The playdough can be stored at room temperature.

Hmm … I feel like I’m forgetting the most important step.  Oh, that’s right – PLAY! Now you know how to make playdough at home!

For more creative goodness visit Homemade By Jill 

How to make playdough without cooking

You might ask how to make playdough without cooking. Yes, it is possible! Try:

  • 2 cups flour
  • 1/2 cup water
  • 3/4 cup salt
  • 1 Tablespoon oil
  • food coloring

Mix the wet ingredients together and mix the dry ingredients together. Slowing add the wet ingredients to the dry until you have the correct consistency.  This is a super quick and easy playdough recipe! Notice this recipe has no cream of tartar. Yes, you can make playdough without cream of tartar. Cream of tartar is an acid and is used in cooking as a stabilizing agent for items like meringues and whipped cream. While it does help with the consistency…. I bet you won’t miss it. 

Alum versus Cream of Tartar in Playdough

While they aren’t the same thing they can be interchanged in your playdough recipe since they both help with texture and consistency.


Now that you know how to make playdough give these other squishy recipes a try? Try these fun ideas

The post How to make playdough appeared first on Skip To My Lou.

Viewing all 1107 articles
Browse latest View live


Latest Images